

Written by Ashley Aucoin
Does the thought of cleaning out your closet send a shiver down your spine? If only you knew where that warm wool sweater was. Decluttering your wardrobe is a task that often gets pushed onto Future You, but not any more. Today we are going to tackle this chore head-on, and who knows, maybe you will find an old shirt that’s back in style or some great pieces you can sell at a local consignment shop.
Health Benefits of Decluttering
You don’t need to overhaul your life like you’re on an episode of “Hoarders” to reap the benefits of decluttering. Something as simple as organizing your closet can have a huge impact on you mentally and physically.
Clean Closet, Clean Mind: According to Psychology Today, living with clutter makes it harder for us to relax while inhibiting our creativity and productivity. Clutter can take our attention away from the things we should be focused on, causing us to procrastinate and our minds to wander. If you’re having trouble concentrating or often find yourself frenzied, organizing a small part of your environment can help.
Less physical and emotional stress: When you are surrounded by messy spaces it can take a toll on your health. A study conducted in Personality and Social Psychology Bulletin determined women with cluttered homes had increase levels of cortisol – a stress hormone – and reported being depressed and fatigued more often than their tidy peers. Returning to a messy home and a long to-do list could cause cortisol levels to remain high all day, impacting your sleep, mood, and weight. If you don’t have time to tackle all the projects on your to-do list, a quick 10-second tidy can reduce stress and boost your mood.
Fresh start: January is always associated with change and fresh starts. For me, even though my school days are behind me, September brings a similar feeling. I think about it as New Year’s 2.0. Whether you get this feeling at the start of a new month, new week, or a new day, it’s the perfect time to seize that energy and go through your closet to purge the old to welcome the new. It’s time to toss those old sweats that remind you of your university crush, and donate the riding boots you’ve only worn once – to a Western bar – and create a new, clean space for all the wonderful memories yet to be made.
Strategies for Cleaning out Your Closet
Once you’ve committed to organizing your closets and dressers, it can be difficult to know where to begin. Start by taking a deep breath, pouring yourself a glass of wine, and following these steps to a clutter-free wardrobe.
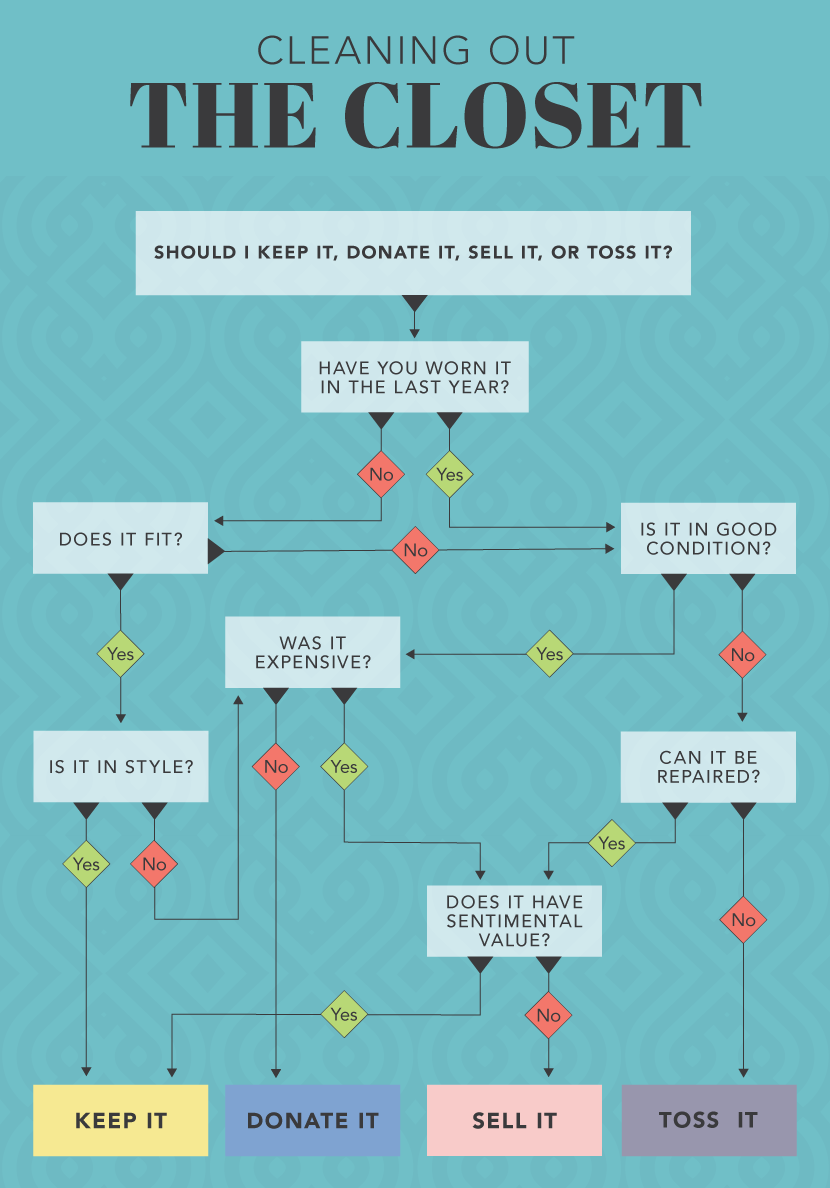
Keep It, Toss It, Donate It, Sell It
Designate an area to put everything from your closet and dressers; we recommend using your bed to avoid having to bend or crouch on the floor. Once everything is removed from your closet and dresser drawers, it’s time to begin sorting.
Clothes in your laundry basket is an automatic keep; they have obviously been worn recently and are part of your weekly rotation. A good rule of thumb is, if you haven’t worn an item in over a year, it’s time to part with it. Before you toss something, inspect it for holes, fraying seams, missing buttons, etc. If the pieces are still in good condition, consider putting them in the donation pile and bringing them to a local charity such as Dress for Success or Goodwill. Brand-name pieces that you no longer wear or use can often be resold online or at a consignment shop. Still not sure what you should do with a piece? Use our handy flowchart to help you decide!
Hung Up on Hangers
There are four common types of hangers: wood, wire, felt, and plastic. I recommend avoiding wire hangers at all costs. While they are economical to purchase, they can warp your clothing, cause deep wrinkles, and even transfer rust to your favorite garment. Not to mention, wire hangers often get tangled together and are very flimsy. They can sag under the weight of heavy items, and clothing can slip off them altogether.
Wood and felt hangers are aesthetically pleasing; however, they can be pricey. If you aren’t ready to splurge on hangers, I recommend picking up plastic hangers. They are low-cost and come in a variety of colors.
Clothes to hang:
- Dresses
- Blouses and dress shirts
- Dress pants
- Blazers
- Skirts
- Ties
Clothes to fold:
- T-shirts
- Jeans
- Knitwear
- Belts
- Bras
- Items with heavy embellishments
Folding Hacks
Socks
Lay matching socks on top of each other. Fold the open ends halfway down. Fold the toes up to so the ends meet and tuck them into the leg holes.
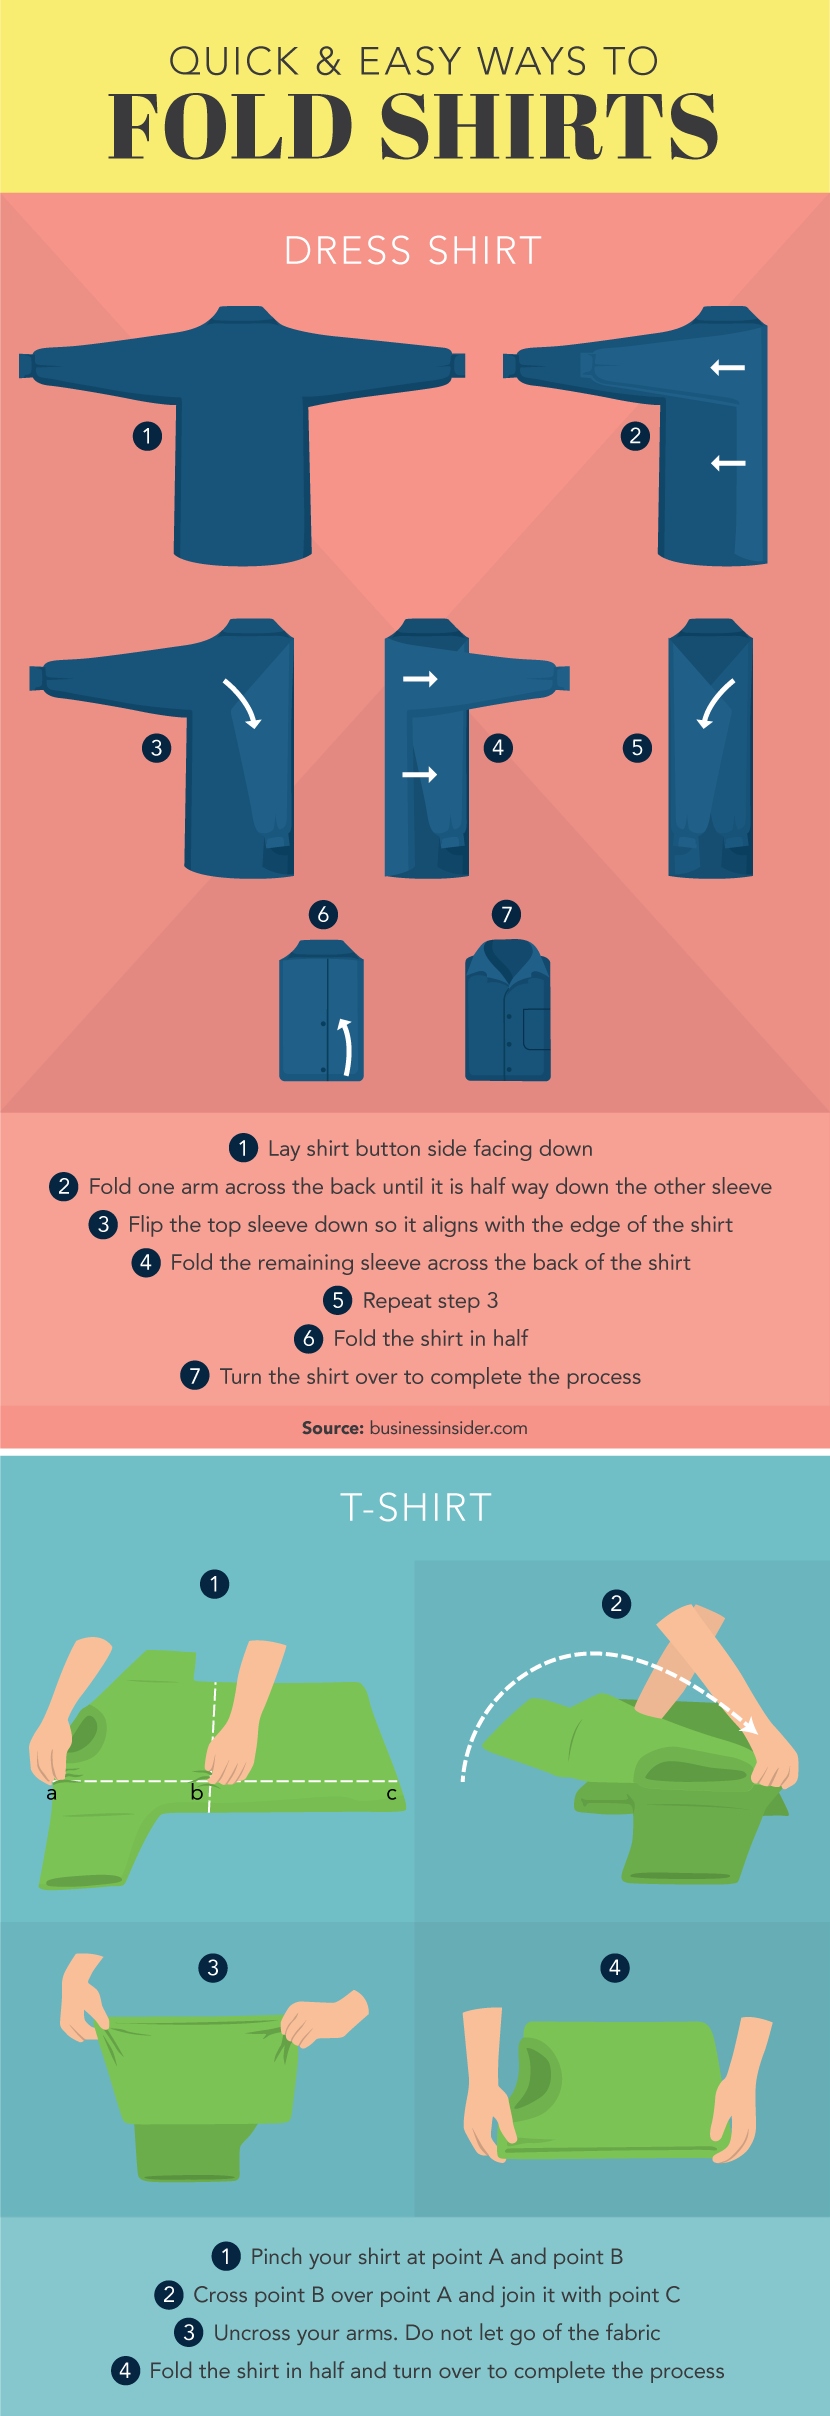
Button-Downs
Dress shirts are usually hung; however, if you are travelling or short on space, knowing how to properly fold can help prevent wrinkles. Start by placing the shirt button side-down on a flat surface. Fold one sleeve a third of the way across the back. Flip the sleeve over and down so it is aligned with your fold. Repeat this technique with the other sleeve so it is lying flat and slightly overlapping your first fold. Fold the hem of the shirt up to the back collar to complete the process.
Shirts
Lay your shirt on a flat surface. Use your right hand to grasp it between the shoulder seam and collar while your left hand pinches the fabric halfway down the shirt; both hands should be aligned. Fold your right hand over your left hand in a straight line and grab the bottom hem of the shirt. Still pinching, lift the shirt and uncross your arms. Fold the shirt in half one more time, and you are done!
Bras
A messy underwear drawer could be ruining your favorite bras. Stack them in your drawer to help them maintain their form and last longer.
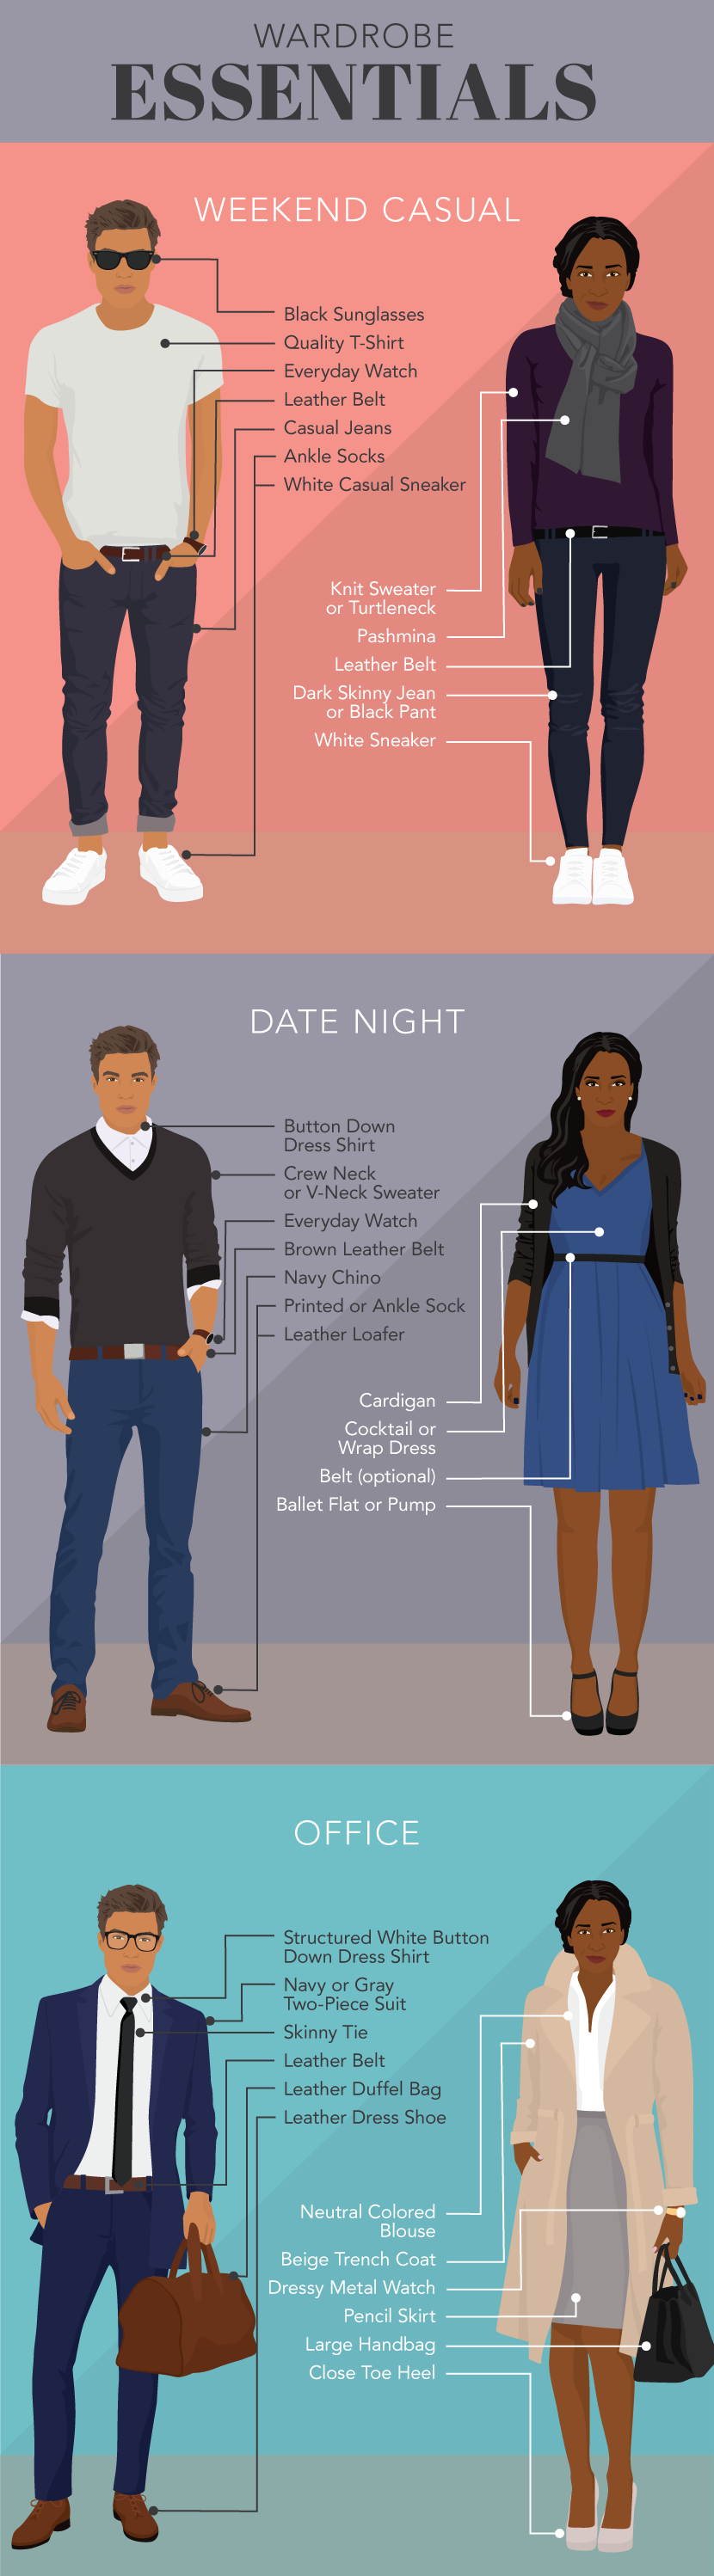
The Basics
After all your hard work tossing and folding, it’s time to take inventory of what you own. Use our checklist as a guide to building a timeless wardrobe. These pieces make up the basis of any great wardrobe and will never go out of style, so go ahead and splurge a little on them!
Men
- White button-down
- Colored button-down
- Crewneck sweater
- Solid polo shirt
- Slim-fit chinos
- Well tailored suit
- Dark jeans
- Quality T-shirts
- Leather belt to match shoes
- Colorful socks
- Dress shoe
- Casual leather shoe
- Dress watch
- Solid tie
- V-neck sweater
Women
- Short-sleeve white T-shirt
- Long-sleeve black shirt
- Neutral color cardigan
- Dark skinny jean
- Pencil skirt
- Blazer
- White dress shirt
- Black turtleneck
- Wrap dress
- Crewneck sweater
- Black pants
- Casual sneakers
- Ballet flats
- Black pumps
- Trench coat
DIY Shoe Rack
Finding space to store all your shoes can be tricky and often ends with piles of flip-flops and flats at the bottom of your closet. This DIY shoe rack is customizable to fit all your favorite shoes, even your knee-high leather boots!
Supplies needed for this DIY:
- Thick plywood
- Wooden dowels
- Wood screws
- Drill
- Tape measure
- Sandpaper
- Sanding block
- Circular saw
- Casters (optional)
Instructions:
- 1. Determine the dimensions for your shoe rack. Start by measuring the length and width of your closet, as well as the length of your largest shoe. Your shoe size will determine how narrow, or wide, your finished project can be. Measure your tallest shoes to get the height.
- 2. Once you have your measurements, mark the length and depth on your piece of plywood. Cut along these lines with your circular saw and sand down the edges. Repeat this step so you have two shelves that are the same size for the top and bottom of your shoe rack.
- 3. Mark the height of your tallest boot on the wooden dowels and cut four equal pieces.
- 4. Time to get creative! Once you know the height of your shoe rack, you can add customized shelves within it using varying dowel heights.
- 5. Once you have all your dowels and shelves cut, drill holes in the corners of each shelf, and in the ends of the dowels.
- 6. Starting with the smallest inside pieces and working your way out to the longest boards, screw the shelves and dowels together.
- 7. Optional step: Screw wheels to the bottom of your shoe rack for easy access and mobility.
One Final Tip: To avoid having to go through this process every few months, apply the rule of one-in-one-out to all your purchases. If you buy a new piece of clothing or pair of shoes, you must eliminate something from your closet to make room for them. This will help you stay organized and could help you save money!
Source: Fix.com Blog


